Animated Wallpaper for Computer


           Many people today are looking for a variety of ways to decorate the  background on their desktop. Watery Desktop 3D is an animated wallpaper software that gives a new touch to the desktop creating a more interactive atmosphere entirely different from the ones we ordinarily see. Watery Desktop 3D offers an assortment of various animated wallpapers including water effects, waves and rain, and additional effects of soft ripples and raindrops. The unique software relaxes and soothes the viewer and is compatible with all mainstream operating systems like Windows 7, 8, 10 Windows Vista, and Windows XP. 

TO DOWNLOAD  CLICK HERE
TO VISIT PAGE CLICK HERE

You can also download different wallpapers effects software from this Web site. 

How Show Bluetooth Icon in System Try

     Some times you are missing your Bluetooth icon from system try or Notification area. It will be difficult you to sending and accepting data.

To enable Bluetooth icon to Notification area follow these steps.

1. Open Registry Editor,     To open :- Click Run, and type REGEDIT

2. Select HKEY_CURRENT_USER.

3. Click on Control Panel.

4. Select Bluetooth.

5. Double click on Notification Area Icon, and change the value of 'Value dare' to 1. and press OK.


6. Restart your system.

Screenshot in Windows 10

A screenshot is an image, that you visible in monitor, mobile or any other visual devices. This is also known as Screen Capture, Print Screen. It will helpful if you want to share the contents of your screen. 

How to take a screenshot

Method 1: Capture full screenshot using Keyboard shortcut.

Press Win + Print Scrn Button. The screen may dim for a second, the screen will save as an image.


Locate the screenshot.
  • Open File Explorer.
  • Select Picture from the left panel.
  • Go to the 'Screenshots' folder, screenshot will there.
Method 2: Copy and paste in Paint using Keyboard.

  • Select the window you want to screenshot by clicking on the title bar.
  • Press Alt + Print Scrn (or some devices required to press Alt + Fn + Print Scrn). The screenshot will be copied to clipboard.
  • Open Paint.
  • Paste the image on Paint by pressing Ctrl + V.
  • Crop the image if you wish.
  • Save the image, by giving preferred name and location.

Method 3: Using Snipping Tool
  • Search 'Snipping Tool' in Search box

  • Click on New button. 

  • Drag the mouse you want to capture. By default it will rectangle shape, you can change it to 
  1. Free from snip
  2. Rectangular snip
  3. Window snip
  4. Full-screen snip
  • You can highlight using highlighter and pen, and also erase using eraser.
  • Finally save image preferred location.
Method 4: Using Windows Ink Workspace
  • Press Win + W
  • In right side of the screen Windows Ink Workspace will open.
  • Choose "Screen sketch".
  • Finally save it by clicking Save button.
Method 5: By using Screenshot software

        You can also capture your screen by using software, some of listed below.

  1. Lightshot
  2. Screenshot Captor
  3. Greenshot
  4. 7capture
  5. Tiny Take


Unblock an App Publisher on Windows 10

     Some times, when we are try to install software in Windows 10 we see the error: "This publisher has been Blocked from Running Software on your Machine". To install the blocked software we need to allow the publisher in Windows. With a just click in older version of Windows it's possible, but in Windows 10 it's not. There is no option to "Proceed anyway". Follow these simple steps to install blocked software.

  • Press Win + X button, in the lower left corner of the screen appear a menu.

  • Select "Command Prompt(Admin) from appeared menu. If not found this, go to Windows directory and open System32, search 'cmd' and open it.


  • Copy the path of program that you want to install.
  • Paste the path on command prompt by pressing Ctrl+V.

  • Click Enter key and continue Installation of blocked App.

Top Tips to Increase Bit torrent Download Speed

The latest file sharing protocol  bittorrent has modified everything when it comes to file sharing. It is a nice platform for downloading large files. Sharing of files include movies, iso images and mp3 songs. Bittorrent is mainly famous for illegal file sharing.

The Bittorent system can be slow at times due to heavy traffic. So let us tweak bittorent sharing program a little bit.

There are lot of different bittorent clients that you can download. I think the best are BitCommet and uTorrent.

Here is a few tips to speed up uTorrent Client. Similar can be implemented on any other torrent clients, which you are sharing.

Step 1: Increase TCP connections

You need to increase the number of TCP connections that are allowed at max.Windows XP Service Pack 2 came with the number of allowed open connections to 10. This is to stop any piece of spyware(in our case bittorent client even) from totally taking over your internet connection. TCP connection allowed should be 50 for optimal performance. The best way to increase the maximum number of connections is to apply patch that is available at www.lvllord.de. A nice way to fix this is to download this patch .

The little tweak to the torrent client works great in certain times. If you’re using uTorrent go to Options menu then Preferences. In the Preferences go the Advanced Options. In the advanced options change the net.max_halfopen connections to 80. In the same section change the max half open tcp connections to 80. Once your done click on OK and you are all set. This tweak will let the maximum TCP connection available for the bittorrent client. Now start downloading you’ll realize a little difference in the download speed. Port forwarding technique is more effective than this.

A third point of interest is that some “windows updates” revert your tweaked tcp connections back to 10. So it’s wise to check this every now and then. You can check this by going to (in windows xp) Start > Control Panel > Administrative Tools > Event Viewer > System… Look for event 4226 (sort by event).

If there are a lot of daily occurrences it’s likely that the max amount of half-open tcp connections was set back to 10. Or you’re infected with some nasty spy ware…

Step 2:Torrent Client Configuration

In order to apply these tips you must know your maximum up- and download speed. You can test your bandwidth over here (stop all download activity while testing).
Settings 1-4 can be found in the options, settings or preference tab of most torrent clients.

1. Maximum upload speed

Probably the most important setting there is. Your connection is (sort of) like a pipeline, if you use you maximum upload speed there’s not enough space left for the files you are downloading. So you have to cap your upload speed.

Use the following formula to determine your optimal upload speed…

80% of your maximum upload speed

so if your maximum upload speed is 40 kB/s, the optimal upload rate is 32kB/s But keep seeding!
                                

Increase Virtual Memory

WHAT IS VIRTUAL MEMORY?

Virtual memory is a feature of Operating System that allows a computer to compensate for shortage of physical memory by temporarily transferring pages of data from Random Access Memory (RAM) to disk storage.

If virtual memory is too low, we can increase it. 

Increase your virtual memory and make your system faster.

  • Hold down the 'Windows' key and press 'Pause/Break' button at the top right of your keyboard. Another way is Right-Clicking on 'Computer' and select 'Properties'. 


  • Click on Advanced system settings.
  • New window will open, named as System Properties.
  • Click on the 'Advanced' tab, under 'Performance' click 'Settings'. 
  • Click the 'Advanced' tab on the button that pops up. 
  • Under 'Virtual memory' at the bottom click 'Change'.
  • In new pop up window remove check 'Automatically manage paging file size for all drivers'. 
  • Click the 'Custom size' button.
  • For the initial size (depending on your HD space), type in anywhere from 1000-1500 (although I use 4000) and for maximum size type in anywhere from 2000-2500 (although I use 6000).
  • Click 'Set' and then exit out of all windows.
  • Finally, Restart your computer.
  • You now have a faster computer and 1-2 GB of Virtual RAM. 


Activate WhatsApp Video call


WhatsApp is a most popular Messenger, more than one Billion peoples are downloaded from google play. It is available in different platforms like Android, Windows, Mac/iPhone, Nokia, Blackberry etc. It allows to send text messages, audio messages, images, videos, PDF files, documents, mp3, location etc.

Everyone know the main defect of WhatsApp was there is no Video calling facility. But new Beta version of WhatsApp included Video calling facility.

Download the latest version of WhatsApp from here.

DOWNLOAD

After downloading new version of WhatsApp, install it. If you are using WhatsApp already upgrade old to new version.


After installing new version of WhatsApp, open any contact, there you can see right corner a simple of call like as voice call enabled version.

Tap on Call simple, then you can see two option, showing Voice Call and Video Call.
Tap on Video Call. Now you enabled Video Call on WhatsApp.

Remember

  • You should download latest WhatsApp. This we can't find in Play Store.
  • Should download from above link.
  • Share to friends to enable their mobile also.
  • If there in friends mobile no installed latest whatsapp you can't use this feature.

Change Processor Name

There have 2 way to change processor name. But its just for fun. By changing name it will not affect the speed of the computer. 

First way

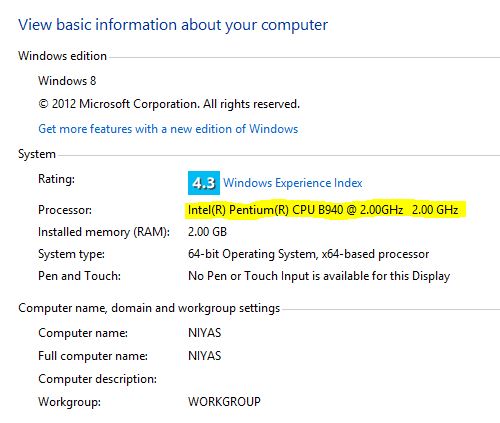
  • Before changing the name, check the name by  Right click on "My Computer" and click on "Properties" you can see the Processor name. In the below pic you can see my processor name as "Intel(R) Pentium(R) CPU B940 @ 2.00GHz 2.00 GHz. It's Old one, but I think its faster for me. Now going to Change Latest Processor name as 
  • Go to Start Menu, Select Run, or Press Win+R short cut key. -- Type 'regedit' without quote for getting Registry Editor.


  • Now get Registry Editor. 


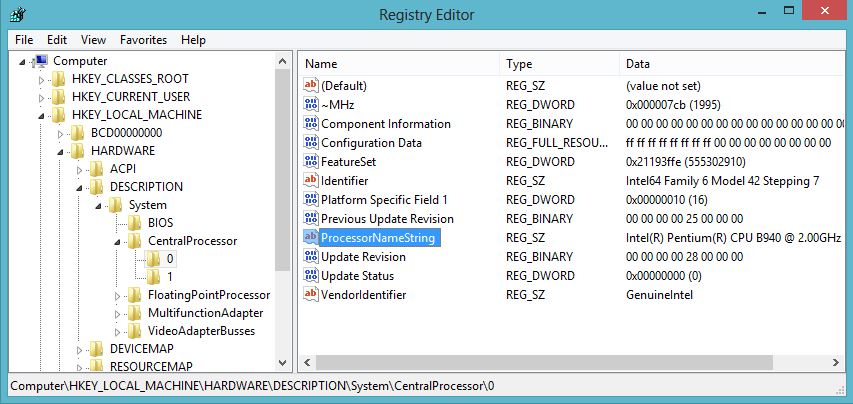
  • Search Processor name from Registry Editor, Press Ctrl+F fro search window. Type 'ProcessorName' in search window. Or you can Find ProcessorName by searching manually. 
    • HKEY_LOCAL_MACHINE 
    • HARDWARE 
    • DESCRIPTION 
    • System
    • CentalProcessor
    • 0 and 1, find ProcessorNameString

  • Now double click on ProcessorNameString, you will get Edit String window. Change the Value data. I changed to Core i7 3610QM Processor (3.50GHz). 
  • Check again, Your processor name will changed.

Second way
Second way is very easy, just follow these steps.
  • Open notepad and paste below code.
Windows Registry Editor Version 5.00

[HKEY_LOCAL_MACHINE\HARDWARE\DESCRIPTION\System\CentralProcessor\0]
“ProcessorNameString”=”Core i7 3610QM Processor (3.50GHz)”

  • Save this notepad, by naming "ProcessorName.reg" and change Save as type to 'All Files'. After saving you get a file like below pic. Open by double click and ask do you want to continue? click on Yes, now check the processor name. It will be changed to Core i7 3610QM Processor (3.50GHz).

Second method will work on Windows XP, Windows 7 and 8.

Data Type Modifiers, C++

In previous post Data Types in C++ we know the various data types using in C++. Now let see how can modify these data types. Int, char, float, double data types can be preceded with these modifiers to alter the meaning of the base type to fit various situation properly and expand them to a much larger set. There are four data type modifiers in C++, they are following.

  1. long
  2. short
  3. signed 
  4. unsigned 
Every data type has a limit for the largest and smallest value that it can store. This is known as the range. An integer can store any value ranging from -2147483648 to 2147483647. Data type modifiers usually alter the upper and lower limit of a data type. Unsigned modifiers makes a variable only to store positive values. 

Size and Range of C++ Data Types 

TYPE
SIZE(Bytes)
RANGE
char
1
-128 to 127
unsigned char
1
0 to 255
signed char
1
-128 to 127
int
2
-32768 to 32767
unsigned int
2
0 to 65535
signed int
2
-32768 to 32767
short int
2
-32768 to 32767
unsigned short int
2
0 to 65535
signed short int
4
-32768 to 32767
long int
4
-2147483648 to 2147483647
unsigned long int
4
0 to 4294967295
signed long int
4
-2147483648 to 2147483647
float
4
3.4E-38 to 3.4E+38
double
8
E-7E-308 to 1.7E+308
long double
10
3.4E-4932 to 1.1E+4932

Win + Keyboard Shortcut

  1.  Win + "Start Typing" - Search you PC.
  2.  Win +  .  - Cycle through open application.
  3.  Win +  , - Temporarily peek at the Desktop.
  4.  Win +  / - Initiate IME reconversion.
  5.  Win +  + - Zoom in using Magnifier.
  6.  Win +  - - Zoom out using Magnifier.
  7.  Win +  Esc - Exit Magnifier. 
  8.  Win - Display or hide Start Menu.
  9.  Win + B - Set focus on the notification area.
  10.  Win + C - Open the Charm. In an application, open the command for the application.
  11.  Win + D - Display the Desktop
  12.  Win + E - Open My Computer
  13.  Win + F - Search for a File or Folder.
  14.  Win + H - Open the Share Charm. 
  15.  Win + I - Open the Settings Charm.
  16.  Win + K - Open the Devices Charm.
  17.  Win + L - Lock the Computer or Switch Account.
  18.  Win + M - Minimise all of the Windows.
  19.  Win + O - Lock the screen orientation - Portrait or Landscape.
  20.  Win + P - Choose a presentation display mode.
  21.  Win + Q - Open the search Charm to search everywhere or within an open application
  22.  Win + R - Open the Run dialog box.
  23.  Win + S - Open the search Charm to search Windows and the Web.
  24.  Win + T - Cycle through application on the Taskbar.
  25.  Win + U - Open Utility Manager. / Open Easy of Access Center.
  26.  Win + V - Cycle through Notification.
  27.  Win + W - Open the search Charm to search settings.
  28.  Win + X - Open the Quick Link menu.
  29.  Win + Z - Show  the commands available in the application.

How to Install of Turbo C++

First of all we need a editor Turbo C++. In your computer not installed this compiler or editor, you must download and install it. Here Turbo C++ for Windows 7,8,8.1 and Windows 10 with full window screen mode. Follow the instruction to download and installing.

1- Download Turbo C++ from here.          
            DOWNLOAD

2- If any previous version of Turbo C++ installed in your system, uninstall it.
3- Extract the downloaded zip file.
4- Run "setup.exe" file.
5- Follow the instruction.

STRUCTURE OF A PROGRAM, C++

Every programming language has a particular structure, like other programming language C++ has their own structure for writing program. Basic structure of C++ programming language as follows.


A simple program for demonstrate the basic structure of C++ programming language. Each code explained briefly. 


//my first program in C++
This is a comment line. The comment are ignored by the compiler. All lines beginning with two slash sign(//) are considered comments. The programmer can use them to include short explanations or observations within the source code itself. In this case, the line is a brief description of what our program is. If we want multiple lines in a comment it is enclosed between /* and */.

#include<iostream.h>
This is a header file of C++. Lines beginning with a hash sign (#) are directives for the preprocessor. File iostream.h is a header file needed for input or output requirements of the program. The C++ languages several headers, like,<stdio.h><conio.h>, <iostream.h> etc., which contain information that is either necessary or useful to your program. The header file are not regular code lines with expressions but indications for the compiler's preprocessor. In this case the directive #include<iostream.h> tells the preprocessor to include the iostream.h standard header file. this specific file (iostream) includes the declarations of the basic standard input-output library in C++, and it is included because its functionality is going to be used later in the program.

int main()
This line corresponds to the beginning of the definition of the 'main' function. The main function is the point by whee all C++ programs start their execution, independently of its location within the source code. It does not matter whether there are other functions with other names defined before or after it. The instructions contained within this function's definition will always be the first one to be executed in any C++ program. For that same reason, it is essential that all C++ programs have a main function. The word main is followed in the code by a pair of parentheses '()'. 

Braces '{ }'
Right after these parentheses we can find the body of the main function enclosed in braces '{}'. What is contained within these braces is what the function does when it is executed.

cout<<"Hello World1!";
This line is a statement to print our message "Hello World!" on the screen. A statement is a simple or compound expression that can actually produce some effect. This is the body of the function, main(). All statement within the body should be indented for legibility, and each statement must be terminated by a semicolon. 

return 0;
This is a new type of function, when a program finished running it send the value zero (0) to the operating system, that means the execution of the program is over. 

DATA TYPES, C++

Data Types
In programming, information are stored in computer memory with different data types. They are used for define what type of variables are used in a programming. Variables are nothing but reserved memory location to store values. 

C++ support large number of data types. Data type is the type of value (data) stored by a variable. C++ provides a predefined set of data types for handling the data is uses. Data can be of many types such as character, integer, real etc. Since the data to be dealt with are of many types, a programming language must provide different data types. In C++ data types are of two types, Fundamental Data Types and Derived Data Types.

Fundamental Data Types
As the name suggests these are the fundamental data types in C++. Fundamental data types are :
  • Character Data Type
  • Integer Data Type
  • Floating-Point Data Type
Character Data Type: The character data type is used to store characters, small integer and punctuation mark - typically ASCII characters but not always. "char" keyword is used to declare these type of variable. Each character is enclosed in single quotes. The signed range of char data is -128 - 127 and the unsigned range between 0-255. Character data type's size is one byte.

Integer Data Type: The integer data type is used for storing whole numbers. We can use signed, unsigned or plain integer values. The range of values for this type will be defined by compiler, normal range is -32768 - 32767, and size is 2 bytes. "int, short / long" keyword is used to declare these type of variable. C++ provide nine built-in integer data type. They are follows.

TYPE
SIZE(Bytes)
RANGE
int
2
-32768 to 32767
unsigned int
2
0 to 65535
signed int
2
-32768 to 32767
short int
2
-32768 to 32767
unsigned short int
2
0 to 65535
signed short int
4
-32768 to 32767
long int
4
-2147483648 to 2147483647
unsigned long int
4
0 to 4294967295
signed long int
4
-2147483648 to 2147483647

Floating-Point Data Types: A number having fractional part is a floating point number. An identifier declared as "float or double". Floating point variable represent real numbers. They can represent a much greater range of values. These are three sizes, float, double and long double.

TYPE
SIZE(Bytes)
RANGE
float
4
3.4E-38 to 3.4E+38
double
8
E-7E-308 to 1.7E+308
long double
10
3.4E-4932 to 1.1E+4932

Derived Data Types

These are the data types which are derived from the fundamental data type. It further divided into two categories, Built-In and User-Defined. Built in data types are array, function, pointer, reference and constant. User defined data types are class, structure, union and enumeration.

Built-In Derived Data Types

Arrays: Arrays refers to a list of finite number of same data types. Array is a collection of data element in which all element are same data type hence homogeneous data. An array is a series of elements of the same data type place in contiguous memory locations that can be individually referenced by adding an index to a unique identifier. The data in the array can be accessed by an index number ranging from 0 to n, where n is the number of data element in can store.

Pointer: A pointer is a variable that holds the memory address of other variable. It is also of different data types. Pointers provide indirect access to values

User Defined Derived Data Type

C++ allows user to define new type of data types based on the other existing data types. Fundamental data types are directly recognised by the C++ compiler. 

Class: A class is a collection of variables and functions under one reference name. It is the way of separating and storing similar data together. A class is a collection of a fixed number of components (members). A class definition begin with the keyword 'class'. The body of the class is contained within the set of braces. ({};). Member functions are often the means of accessing, modifying and operating the data members(i.e. variables). It is one of the most important features of C++ since OOP is usually implemented though the use of classes.

Structure: In C++ structure and class are same except for some very minor differences. A structure is a collection of variables which can be same or different data type under a single name 

Union: A union is a user defined data type or class type, that at any given time, contains only one object from the list of members. A union is a memory location shared by two or more different variables, generally of different types.

Enumeration: Enumeration is a user defined data type. It can be used to assign names to integer constants. Enumeration are declared by the keyword 'enum'.

Each topic will discuss detail. 

POPULAR THIS MONTH

Blog Archive